Dreamhack - file-csp-1 (write-up)
오늘은 file-csp-1을 풀어볼 것이다.
이 문제는 csp를 이해하고, 어떻게 설정하는지 알면 된다.
$사전 조사
일단은 주어진 파일들을 살펴보자.
#!/usr/bin/env python3
import os
import shutil
from time import sleep
from urllib.parse import quote

from flask import Flask, request, render_template, redirect, make_response
from selenium import webdriver

from flag import FLAG

APP = Flask(__name__)


@APP.route('/')
def index():
    return render_template('index.html')


@APP.route('/test', methods=['GET', 'POST'])
def test_csp():
    global CSP
    if request.method == 'POST':
        csp = request.form.get('csp') #get csp
        # start bot..
        try:
            options = webdriver.ChromeOptions()
            for _ in ['headless', 'window-size=1920x1080', 'disable-gpu', 'no-sandbox', 'disable-dev-shm-usage']:
                options.add_argument(_)
            driver = webdriver.Chrome('/chromedriver', options=options)
            driver.implicitly_wait(3)
            driver.set_page_load_timeout(3)
            driver.get(f'http://localhost:8000/live?csp={quote(csp)}') #get csp
            try:
                a = driver.execute_script('return a()');
            except:
                a = 'error'
            try:
                b = driver.execute_script('return b()');
            except:
                b = 'error'
            try:
                c = driver.execute_script('return c()');
            except Exception as e:
                c = 'error'
                c = e
            try:
                d = driver.execute_script('return $(document)');
            except:
                d = 'error'

            if a == 'error' and b == 'error' and c == 'c' and d != 'error':
                return FLAG

            return f'Try again!, {a}, {b}, {c}, {d}'
        except Exception as e:
            return f'An error occured!, {e}'

    return render_template('check.html')


@APP.route('/live', methods=['GET'])
def live_csp():
    csp = request.args.get('csp', '') #get csp
    resp = make_response(render_template('csp.html'))
    resp.headers.set('Content-Security-Policy', csp)
    return resp


if __name__ == '__main__':
    APP.run(host='0.0.0.0', port=8000, debug=True, threaded=True)
일단을 위쪽을 보면, 아래처럼 중요한 부분을 정리 가능하다.
try:
	a = driver.execute_script('return a()');
except:
	a = 'error'
try:
	b = driver.execute_script('return b()');
except:
	b = 'error'
try:
	c = driver.execute_script('return c()');
except Exception as e:
	c = 'error'
	c = e
try:
	d = driver.execute_script('return $(document)');
except:
	d = 'error'

if a == 'error' and b == 'error' and c == 'c' and d != 'error':
	return FLAG
먼저 위를 보면, a는 error, b는 error, c는 출력, document를 허용해야한다.
def live_csp():
    csp = request.args.get('csp', '') #get csp
    resp = make_response(render_template('csp.html'))
    resp.headers.set('Content-Security-Policy', csp)
    return resp
위는 csp.html을 가져와서 우리가 입력한 csp설정을 적용한다.
<!doctype html>
<html>
	<head>
	<!-- block me -->
	<script>
		function a() { return 'a'; }
	</script>
	<!-- block me -->
	 <script nonce="i_am_super_random">
		function b() { return 'b'; }
	</script>
	<!-- allow me -->
	 <script nonce="i_am_super_random">
		function c() { return 'c'; }
	</script>

	<!-- allow me -->
	<script
  src="https://code.jquery.com/jquery-3.4.1.slim.min.js"
  integrity="sha256-pasqAKBDmFT4eHoN2ndd6lN370kFiGUFyTiUHWhU7k8="
  crossorigin="anonymous"></script>
	</head>
</html>
위는 csp.html이다.
그리고 /test는 뭐가 allow되었는지 나오고, /verify는 그냥 통과만 확인해주기 때문에, /test로 진행한다.
$취약점 분석
일단은 우리가 해야할 것은 csp를 일부분만 허용하여 a,b는 거절, c랑 document를 허용하면 된다.
그냥 csp만 잘 설정하자.
$H4ck1ng T1m3
이제 본격적으로 flag를 얻어보자.
csp를 어떤식으로 설정해야하는지 아래 사이트를 참고해서 알수있다.
https://book.hacktricks.xyz/pentesting-web/content-security-policy-csp-bypass
https://content-security-policy.com/
기본적으로 아래처럼 사용할 수 있다.

이처럼 하면 모두 block되어서 콘솔에서 확인할 수 있다.
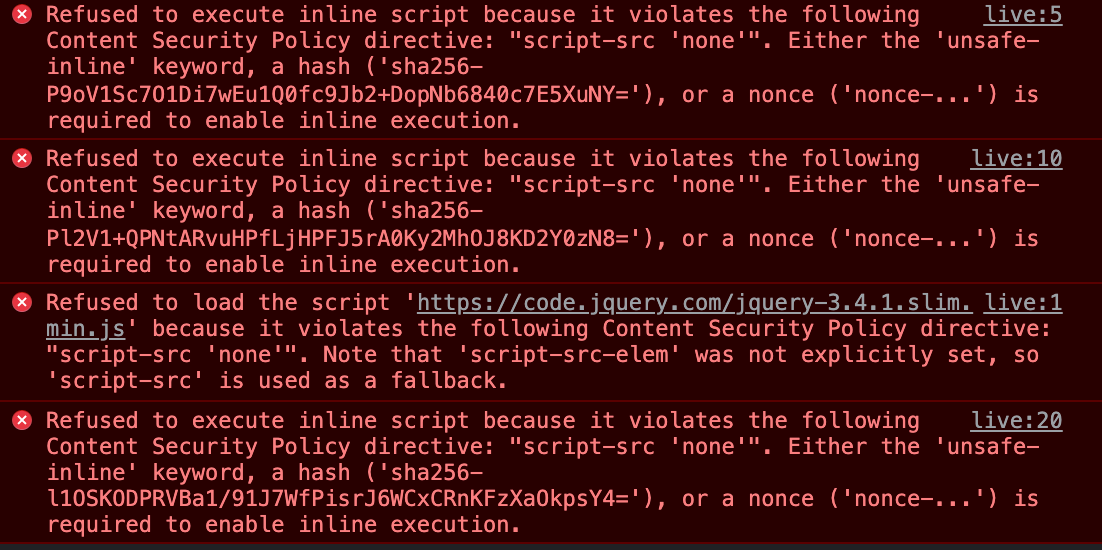
1번째 sha256이 a함수, 2번째가 b함수, 3번째가 document https, 4번째가 c함수가 된다.
우리는 csp로 c만 allow하면 되서 4번째 sha256만 복사하여 설정하면된다.
sha256 csp설정은 아래처럼 설정된다.
script-src 'sha256-'그러면 c는 아래처럼 된다.
script-src 'sha256-l1OSKODPRVBa1/91J7WfPisrJ6WCxCRnKFzXaOkpsY4='그러면 아래처럼 c가 allow된다.
이제 아까 3번째에서 block된 주소만 허용하면 된다.
csp.html에서 src에 https://code.jquery.com/jquery-3.4.1.slim.min.js 가 있다.
앞이 https이다. csp에서 https 허용은 아래처럼 하면된다.(default를 사용해도된다.)
script-src https~~~그러면 아래처럼 된다.
script-src https://code.jquery.com/jquery-3.4.1.slim.min.js
마지막으로 위의 c함수와 같이 허용하려면, 그냥 https를 뒤에쓰면 된다.
script-src 'sha256-l1OSKODPRVBa1/91J7WfPisrJ6WCxCRnKFzXaOkpsY4=' https://code.jquery.com/jquery-3.4.1.slim.min.js이제 이걸 입력하면 아래처럼 조건을 만족하게 된다.
이제 똑같이 verify에 입력하자.
그러면 flag획득에 성공할 것이다.
